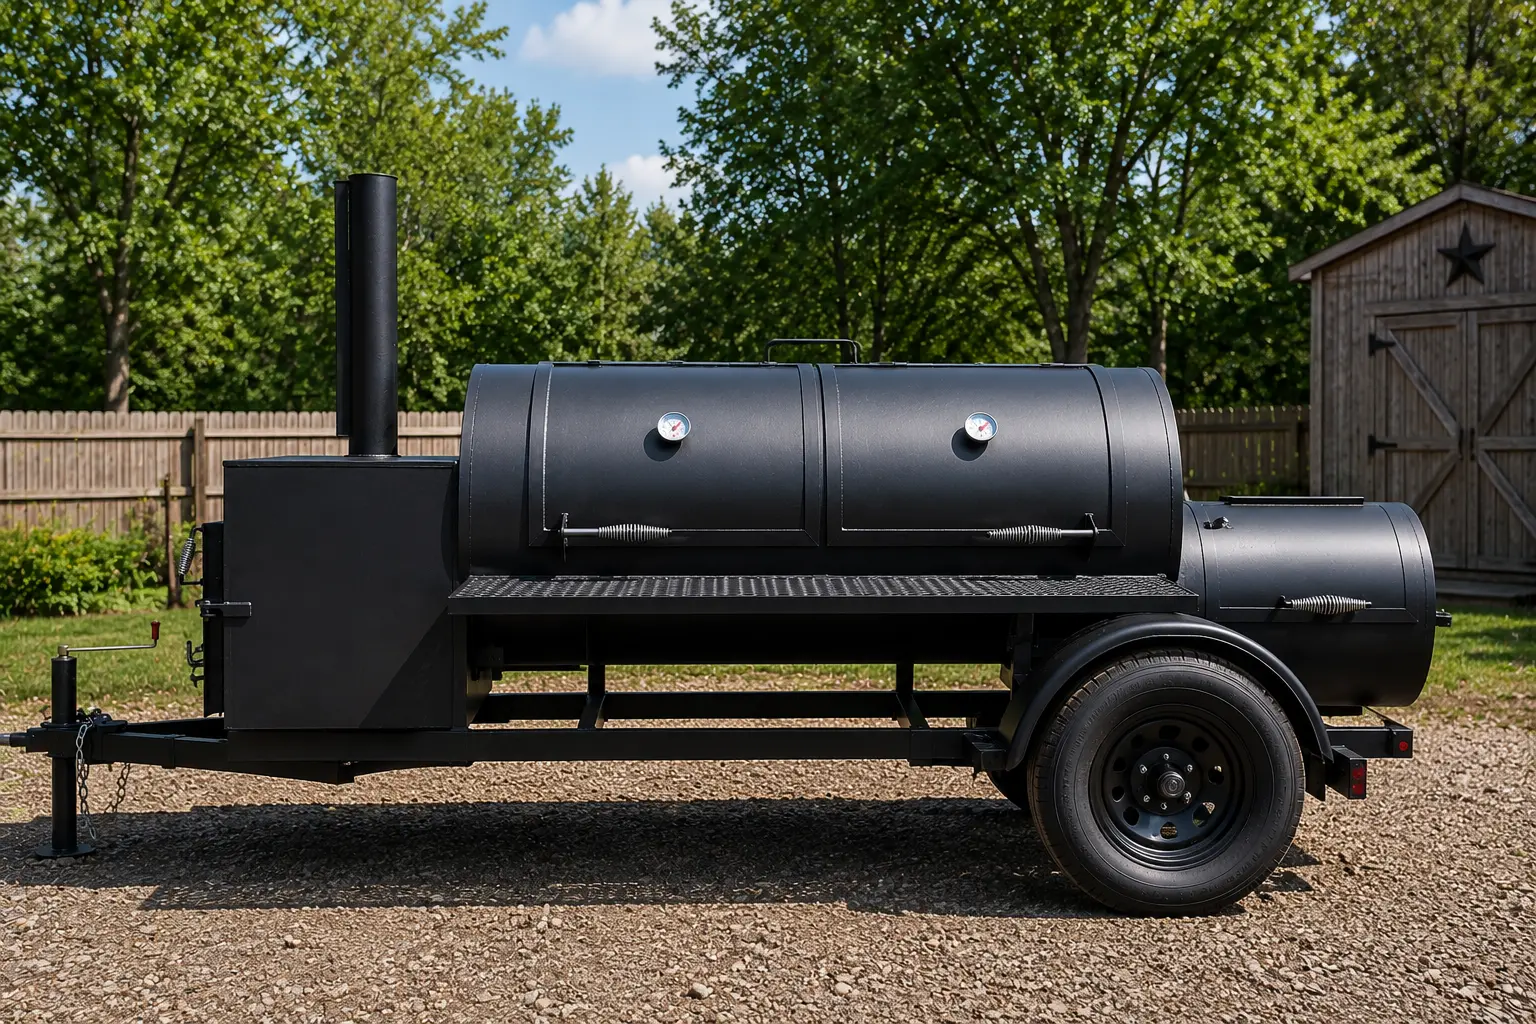
If you are serious about backyard barbecue, learning how to build a reverse flow offset smoker is one of the most rewarding projects you can take on. Unlike a standard offset smoker, a reverse flow offset smoker uses a baffle plate to redirect heat and smoke underneath the cooking chamber before it reaches the exhaust stack. This creates a more even cooking temperature across the entire grate, eliminating the classic “hot end, cold end” problem that plagues traditional offset smokers. In this guide, we will walk through every stage of building a reverse flow offset smoker, from planning and materials to welding, fabrication, and seasoning the finished unit.
Whether you are a hobbyist welder or an experienced metalworker, this guide will show you exactly how to build a reverse flow offset smoker in your own garage or workshop.
What Is a Reverse Flow Offset Smoker?
A reverse flow offset smoker is a modified version of the traditional offset smoker design. In a standard offset smoker, heat and smoke travel directly from the firebox into the cooking chamber and out through a stack positioned near the firebox side. This often causes uneven heat distribution, with the end closest to the firebox becoming significantly hotter than the opposite end.
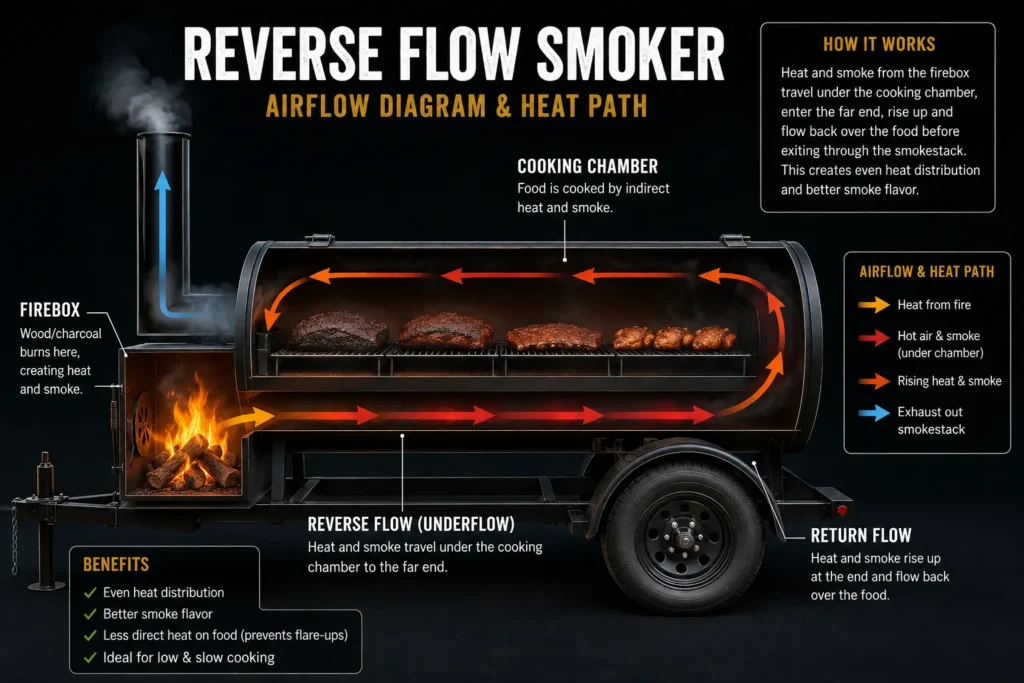
Learning how to build a reverse flow offset smoker means understanding the steel baffle plate that runs along the bottom of the cooking chamber. Instead of smoke rising immediately, it is forced to travel the entire length of the chamber underneath the baffle before rising back over the top and exiting through a stack placed near the firebox. This “reverse” path evens out the temperature and gives you more consistent results, especially during long cooks like brisket or pork shoulder.
Building a reverse flow offset smoker yourself not only saves money compared to buying a premium unit, but also allows you to customize the size, thickness, and features exactly to your needs.
Why Build a Reverse Flow Offset Smoker Yourself?
There are several reasons pitmasters choose to build a reverse flow offset smoker rather than purchasing one:
- Cost savings: Commercial reverse flow offset smokers with thick steel can cost thousands of dollars. Building your own reverse flow offset smoker can cut that cost significantly.
- Customization: You control the size of the firebox, cooking chamber, and baffle design.
- Steel thickness: Many budget commercial smokers use thin steel (1/8 inch or less), which loses heat quickly. A DIY build lets you use thicker steel (1/4 inch or more) for better heat retention.
- Pride and skill development: Building a reverse flow offset smoker teaches valuable welding and fabrication skills.
Materials Needed to Build a Reverse Flow Offset Smoker
Before you start, gather the following materials:
- Steel pipe or tank – A propane tank (100–250 gallons) or thick-wall steel pipe (24–30 inches in diameter) for the cooking chamber.
- Smaller steel pipe or tank – For the firebox, typically 30–40% of the size of the main chamber.
- Steel plate – 1/4 inch thick steel for the baffle plate, plus additional plate for end caps and shelves.
- Steel angle iron – For legs, supports, and the cart frame.
- Hinges – Heavy-duty hinges for the main lid and firebox door.
- Smokestack pipe – Typically 4 to 6 inches in diameter.
- Expanded metal or grates – Stainless steel grates for cooking surfaces.
- Thermometers – Dual thermometers for monitoring both ends of the chamber.
- High-temperature paint – To protect the exterior from rust and heat damage.
- Wheels and casters – For mobility if building a cart-style reverse flow offset smoker.
Having all materials ready before you begin will make the entire build much smoother.
Tools Required
To build a reverse flow offset smoker, you will need:
- MIG or stick welder
- Angle grinder with cutting and grinding discs
- Plasma cutter (optional but highly recommended)
- Drill with metal bits
- Measuring tape and soapstone marker
- Clamps
- Safety gear (welding helmet, gloves, safety glasses)
Step-by-Step Guide: How to Build a Reverse Flow Offset Smoker
Step 1: Plan Your Design and Dimensions
Every successful reverse flow offset smoker build starts with a solid plan. Sketch out the dimensions of your cooking chamber, firebox, and baffle plate. A common ratio is a firebox that is roughly one-third the volume of the cooking chamber. This ensures enough heat generation without overwhelming the chamber.
Decide on the diameter of your main cooking chamber (commonly between 24 and 30 inches) and the overall length (typically 48 to 60 inches). These dimensions will determine how much cooking surface your finished reverse flow offset smoker will offer.
Step 2: Prepare the Cooking Chamber
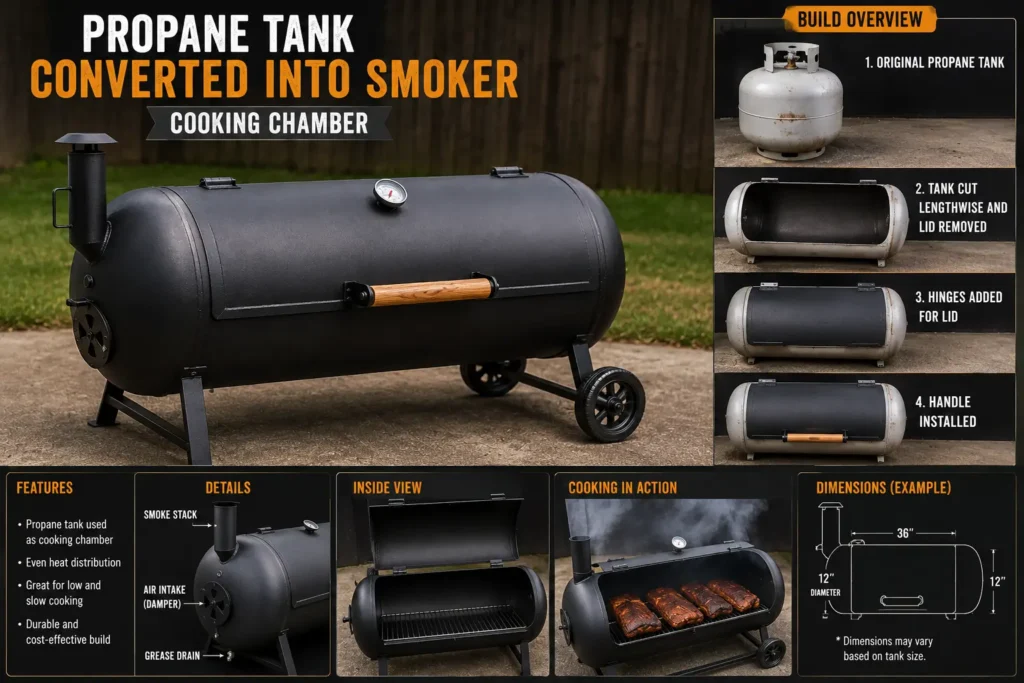
If you are using a propane tank, the first step is to completely purge it of any residual gas. Fill the tank with water and let it sit, then remove the valve carefully. Safety is critical here—never cut into a tank that has not been properly purged, as residual fumes can cause explosions.
Once purged, cut the tank open lengthwise using a plasma cutter or angle grinder to create the hinge line for your lid. This becomes the main body of your reverse flow offset smoker’s cooking chamber.
Step 3: Build and Attach the Firebox
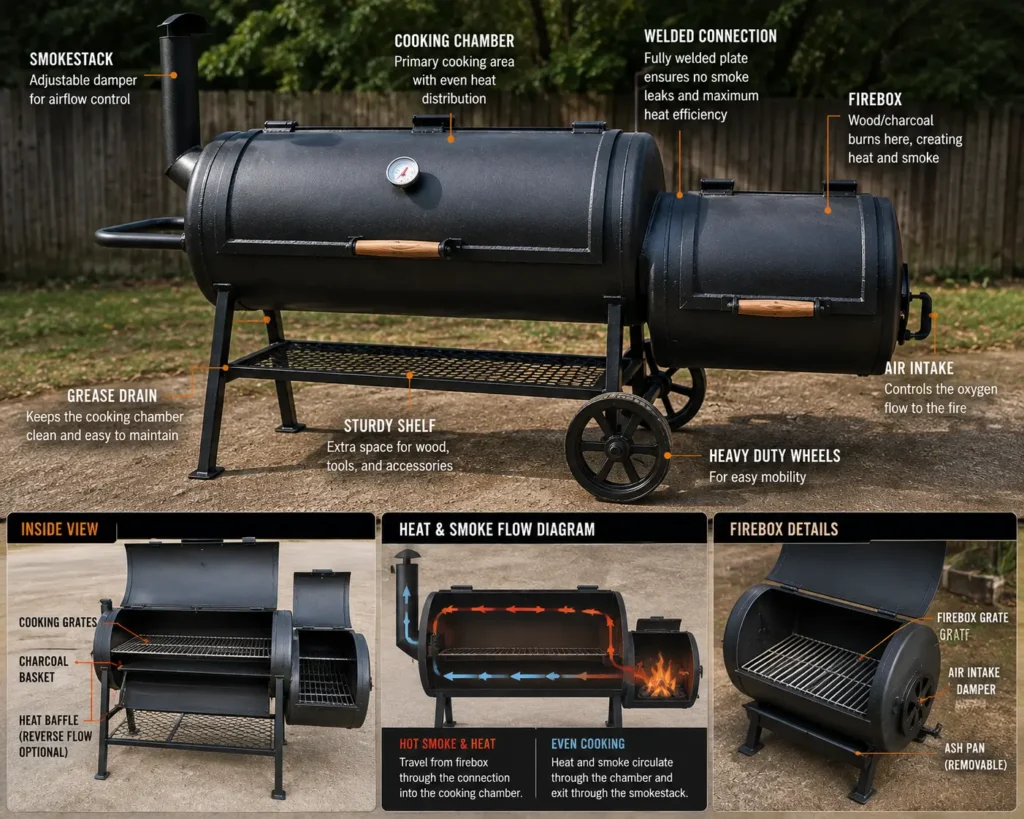
The firebox is where the fire burns and heat is generated for your reverse flow offset smoker. Cut a smaller steel tank or fabricate a rectangular box from steel plate. The firebox should include:
- An air intake vent at the bottom for oxygen control
- A fuel door for adding wood or charcoal
- A grate inside to elevate the fire off the bottom
Weld the firebox to the side of the cooking chamber, positioning the connection point low enough that smoke and heat are forced downward into the chamber before rising.
Step 4: Install the Reverse Flow Baffle Plate
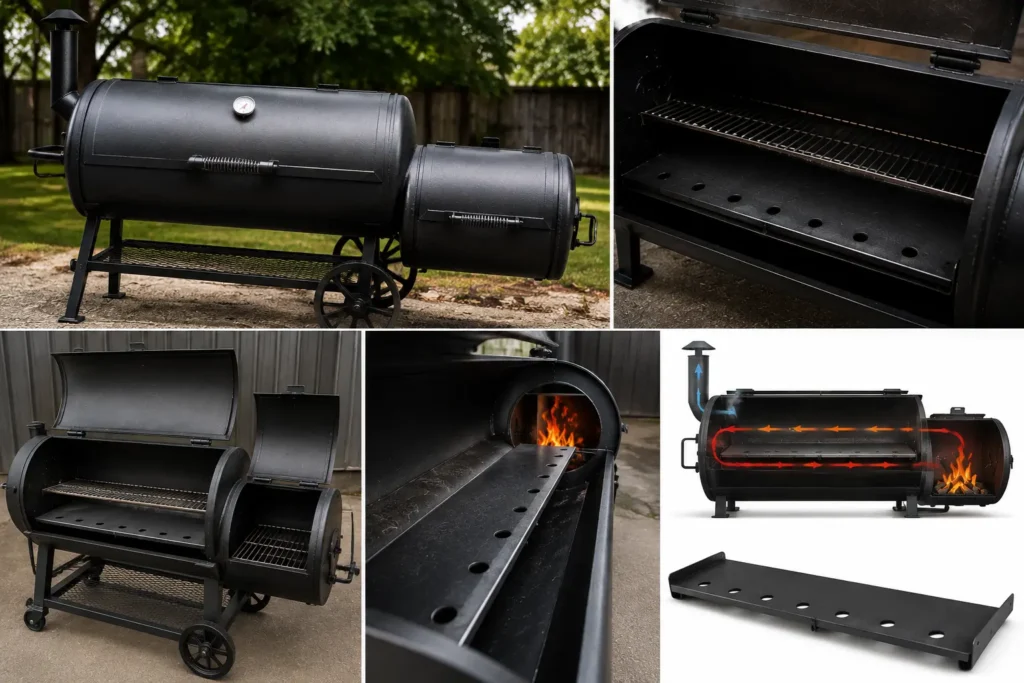
This step is the core of learning how to build a reverse flow offset smoker correctly. Cut a steel plate slightly narrower than the internal diameter of your cooking chamber, leaving a gap of 1 to 2 inches on each side for smoke to pass around. The baffle plate should run about 70-80% of the length of the chamber, positioned a few inches above the bottom.
Weld support brackets inside the chamber to hold the baffle plate level. This plate forces heat from the firebox to travel underneath it, distributing evenly along the length of the reverse flow offset smoker before rising up and over the plate near the far end.
Some builders also add a water pan on top of the baffle plate to help regulate humidity and temperature further—a popular upgrade for any reverse flow offset smoker.
Step 5: Position the Smokestack
Unlike a traditional offset smoker where the stack is placed opposite the firebox, a reverse flow offset smoker typically has its smokestack mounted on the same side as the firebox, near the top. This forces smoke to travel the entire length of the chamber under the baffle plate, then back over the top, before exiting near where it entered.
Cut a hole for the stack and weld it securely in place, ensuring a tight seal to prevent unwanted air leaks.
Step 6: Add Grates, Shelves, and Handles
With the main structure of your reverse flow offset smoker complete, it’s time to add functional components:
- Install two or three tiers of cooking grates inside the main chamber
- Weld a shelf onto the firebox for prepping food
- Add handles to the lid and firebox door
- Install hinges for smooth opening and closing
Step 7: Seal Gaps and Check for Airflow Leaks
Airtight construction is essential for temperature control in a reverse flow offset smoker. Check all seams, the lid, and the firebox door for gaps. Many builders add a rope gasket around the lid seal to minimize smoke leakage, which helps maintain consistent temperatures throughout long cooks.
Step 8: Install Thermometers
Mount two thermometers on the lid of your reverse flow offset smoker—one near the firebox side and one near the far end. Because this design promotes even heat distribution, both thermometers should read relatively close temperatures, usually within 10-15 degrees of each other, unlike a traditional offset smoker where the difference can exceed 50 degrees.
Step 9: Add Legs, Wheels, and Final Touches
Weld angle iron legs onto the bottom of the cooking chamber and firebox for stability. If you want a mobile reverse flow offset smoker, attach heavy-duty caster wheels capable of supporting the substantial weight of steel construction.
Step 10: Paint and Cure Your Reverse Flow Offset Smoker
Apply high-temperature paint rated for at least 1200°F to the exterior surfaces. This protects against rust and gives your reverse flow offset smoker a professional finish. Allow the paint to cure fully according to manufacturer instructions before firing it up.
Seasoning Your New Reverse Flow Offset Smoker
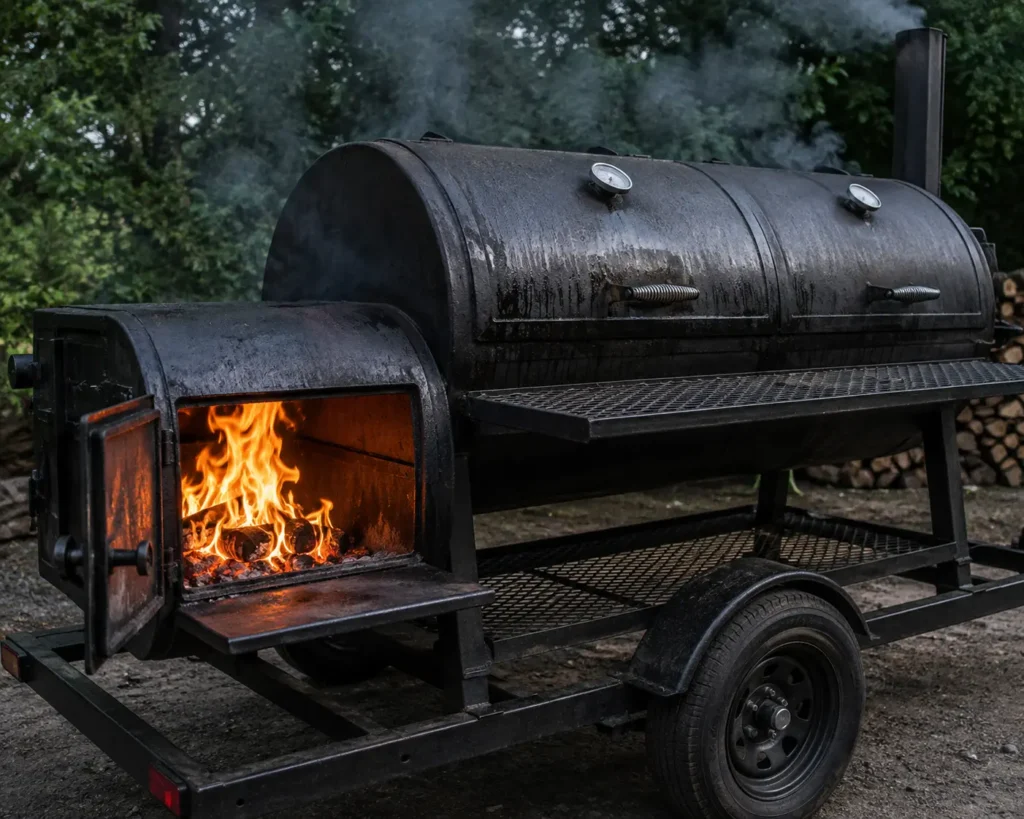
Before cooking any food, you must season your reverse flow offset smoker. This process burns off manufacturing residues, paint fumes, and oils while creating a protective layer of seasoning on the interior metal surfaces.
- Coat the interior of the cooking chamber and firebox lightly with cooking oil.
- Build a small fire in the firebox and bring the smoker up to 250-300°F.
- Maintain this temperature for 2-3 hours.
- Let the smoker cool completely before use.
This seasoning step ensures your reverse flow offset smoker performs well and develops a natural non-stick patina over time.
Tips for Better Results
- Use quality steel: Thicker steel (1/4 inch or greater) retains heat better and requires less fuel to maintain temperature in a reverse flow offset smoker.
- Control airflow carefully: The intake damper on the firebox is your primary temperature control tool.
- Use a water pan: Adding moisture helps stabilize temperature swings during long cooks.
- Clean the baffle plate regularly: Grease and ash buildup on the baffle can affect airflow and smoke circulation over time.
- Practice fire management: Small, hot fires produce cleaner smoke than large, smoldering ones.
Common Mistakes to Avoid
Many first-time builders make errors that reduce the performance of their reverse flow offset smoker:
- Skipping proper tank purging, which is a serious safety hazard
- Using steel that is too thin, leading to poor heat retention
- Improper baffle plate sizing, which disrupts the reverse flow effect
- Poor door and lid seals, causing temperature fluctuations
- Undersized firebox, which struggles to maintain temperature in larger chambers
Avoiding these mistakes will help ensure your reverse flow offset smoker performs like a commercial-grade unit.
Common Questions Before You Start Building
Before diving into the process, many beginners want to know exactly how to build a reverse flow offset smoker without wasting money on the wrong materials. The truth is, understanding how to build a reverse flow offset smoker correctly from the start saves you hours of rework later. Most people searching for how to build a reverse flow offset smoker are surprised to learn that the baffle plate placement matters more than the size of the tank itself.
If you have never welded before, don’t worry — how to build a reverse flow offset smoker as a first-time project is completely doable as long as you follow the steps in order and don’t rush the purging and cutting stages.
Skills You’ll Develop While Building
Learning how to build a reverse flow offset smoker teaches more than just welding. You’ll pick up skills in metal fabrication, airflow engineering, and even basic thermodynamics as you figure out how to build a reverse flow offset smoker that holds a consistent temperature across the entire cooking chamber. Many hobbyists who master how to build a reverse flow offset smoker go on to build custom smokers for friends and family, or even turn it into a small business.
Understanding how to build a reverse flow offset smoker the right way also means you’ll troubleshoot temperature issues faster, since you’ll already know how every weld and joint affects airflow.
Is Building Your Own Smoker Worth It?
Many people ask whether learning how to build a reverse flow offset smoker is really worth the time investment compared to buying one. For most backyard pitmasters, the answer is yes — once you know how to build a reverse flow offset smoker, you gain full control over steel thickness, chamber size, and airflow design, none of which you get with a mass-produced unit. If you’re still on the fence, remember that how to build a reverse flow offset smoker projects typically pay for themselves within a year or two of regular use, simply through better fuel efficiency and durability.
Frequently Asked Questions
Costs vary widely depending on steel thickness and size, but most DIY reverse flow offset smoker builds range from $500 to $1,500 in materials, significantly less than buying a comparable commercial unit.
Most experienced builders recommend at least 1/4 inch steel for the cooking chamber and firebox, as it retains heat far better than thinner gauge steel.
Depending on your welding experience and access to tools, the build typically takes anywhere from one weekend to several weeks for more detailed designs.
Yes, propane tanks are a popular and cost-effective choice for the cooking chamber, but they must be fully purged of gas and residue before any cutting or welding begins.
The baffle plate forces heat and smoke to travel the full length of the chamber before rising, which is what gives a reverse flow offset smoker its signature even heat distribution.
Basic to intermediate welding skills are recommended, since most joints in a reverse flow offset smoker need to be airtight and structurally sound to handle repeated heat cycles.
Regularly clean the baffle plate and firebox of ash and grease, check door seals for wear, and repaint with high-temperature paint as needed to prevent rust.
Mastering Your Backyard Build
Now that you know how to build a reverse flow offset smoker, you can see it’s a challenging but highly rewarding project for anyone passionate about barbecue. From selecting the right steel and planning your dimensions to welding the firebox, installing the baffle plate, and seasoning the finished unit, every step plays a role in creating a smoker that delivers consistent, even heat for perfect results every time. With patience, the right tools, and attention to detail, your reverse flow offset smoker can rival—or even outperform—many expensive commercial models, giving you years of delicious, smoky meals cooked exactly the way you like them.